

Hampel 濾波器常見於過濾原始訊號的離群值,其原理是用中位數估計標準差,並把資料離資料的中心(資料與中位數的差)大於n個標準差(常見取n=3,即三倍標準差)視為離群值,並將離群值改成觀測窗口內的中位數。過濾效果大部分都不錯,不過缺點在於計算消耗較大。
演算法流程拆解
1.在窗口內採樣,求窗口內原始資料的中位數

2.對窗口內所有資料計算其與中位數之差的絕對值,並求這些絕對差的中位數,也就是中位數絕對離差Median Absolute Deviation(MAD)

3.用中位數絕對離差估計標準差,根據公式推導知道估計標準差約等於中位數絕對離差乘上k,且k≈1.4826

4.對原始資料的窗口內的序列的中心(也就是濾波的目標對象),檢查是否大於n個標準差(也就是上面估計的標準差),如果大於就被視為是離群值,並以窗口內原始資料的中位數來代替。

5.採取移動窗口(處理後不放回),直到輸入的資料處理完成。
C++實做
要實做的部份分成幾個部份,這裡規劃成如下四個函式:
1.輸入一組資料,輸出中位數 (template <typename T = double, typename C>

inline const T median(const C &container))

2.計算差的絕對值(inline const double absolute_deviation(double a, double b))

3.在窗口內計算MAD,並求濾波輸出(double hampel_window(const std::vector<double>

&sampled_raw_data, int window_size = 5, double n_times_of_sigma_threshold = 1))

4.採樣器以及提供呼叫的API(移動窗口) (std::vector<double> filter(std::vector<double> &raw_data, int window_size = 5) { std::vector<double> raw_data_in_window, data_output;)
hampel_filter.cpp
#include <pybind11/pybind11.h>

#include <pybind11/stl.h>

#include <algorithm>

#include <numeric>

#include <vector>

#include <cmath>

#include <iostream>

template <typename T = double, typename C>

inline const T median(const C &container) {

 // find median using std::nth_element

 // edit from https://stackoverflow.com/a/39487448

 std::vector<T> arr(std::begin(container), std::end(container));

 size_t middle_ix = arr.size() / 2;

 std::nth_element(arr.begin(), arr.begin() + middle_ix, arr.end());

 if (arr.size() % 2) {

   return arr[middle_ix];

 } else {

   auto iter_max = std::max_element(arr.begin(), arr.begin() + middle_ix);

   return (*iter_max + arr[middle_ix]) / 2.0;

 }

}

inline const double absolute_deviation(double a, double b) {

 return std::fabs(a - b);

}

double hampel_window(const std::vector<double> &sampled_raw_data,

                    int window_size = 5,

                    double n_times_of_sigma_threshold = 1) {

 const unsigned int window_center_ix = window_size / 2;

 const double factor_k = 1.482602218505602;

 double output = 0;

 double median_value = median<double>(sampled_raw_data);

 // compute absolute deviations

 // Xt_ad = |Xt - median (X_window) |

 std::vector<double> absolute_deviations;

 for (auto &value : sampled_raw_data) {

   double AD = absolute_deviation(value, median_value);

   absolute_deviations.push_back(AD);

 }

 // MAD =  median (Xt_ads)

 double MAD = median<double>(absolute_deviations);

 // estimate sigma with MAD

 double sigma_estimate = MAD * factor_k;

 double target_raw_data = (sampled_raw_data)[window_center_ix];

 double target_AD = absolute_deviation(target_raw_data, median_value);

 double threshold = n_times_of_sigma_threshold * sigma_estimate;

 // replace raw data by median or not

 if (target_AD >= threshold) {

   output = median_value;

 } else {

   output = target_raw_data;

 }

 return output;

}

std::vector<double> filter(std::vector<double> &raw_data, int window_size = 5) {

 std::vector<double> raw_data_in_window, data_output;

 for (int i = 0; i < window_size / 2; i++) {

   raw_data_in_window.push_back(0);

 }

 int pos = 0;  // position

 while (pos < raw_data.size() - window_size / 2) {

   // add next data into window at last position

   raw_data_in_window.push_back(raw_data[pos]);

   // if raw data number equal to window size

   if (raw_data_in_window.size() == window_size) {

     // filter data in window

     double filtered = hampel_window(raw_data_in_window, window_size);

     data_output.push_back(filtered);

     // remove first element of raw_data_in_window

     raw_data_in_window.erase(raw_data_in_window.begin());

   }

   pos++;  // move to next data

 }

 return data_output;

}

PYBIND11_MODULE(hampel_filter, m) {

m.def("filter", &filter, "hampel filter");

}
cmake:
cmake_minimum_required(VERSION 3.18)

set(NAME hampel_filter)

project(${NAME})

set(CMAKE_CXX_FLAGS "-std=c++11" )

set(CMAKE_BUILD_TYPE "Release")

find_package(PythonLibs 3.9.5 REQUIRED)

find_package(PythonInterp 3.9.5 REQUIRED)

set(pybind11_DIR /media/whuang022/DATA/anaconda3/lib/python3.7/site-packages/pybind11/share/cmake/pybind11)

find_package(pybind11 REQUIRED CONFIG )

pybind11_add_module(module ${NAME}.cpp)

set_target_properties(module PROPERTIES OUTPUT_NAME ${NAME})

set_target_properties(module PROPERTIES SUFFIX ".so")
編譯與Python呼叫
在source code 的資料夾下開啟終端機
mkdir build

cd build

cmake ..

make
編譯完成後得到 hampel_filter.so
Python 的部份
import hampel_filter

import matplotlib.pyplot as plt

input = [10, 2, 9, 4, 2, 6, 20, 11, 3, 10, 11, 6, 20, 11, 3, 1, 5, 9, 10, 10,

        3, 1, 5, 9, 10, 22, 30, 2, 30, 22, 11, 30, 11, 10, 15, 13, 1, 3, 20, 1, 2]

out = hampel_filter.filter(input, 5)

print(out)

plt.plot(input)

plt.plot(out)

plt.show()
最終繪製出圖表如下:
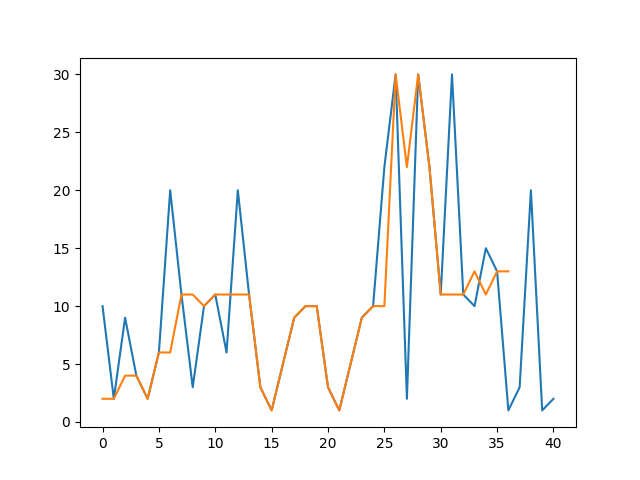
藍色的折線是原始數據,橘色的是經過濾波之後的數據,以上便是Hampel 濾波器的實做。
參考資料:
1. https://github.com/Gluttton/hampel

2. https://github.com/flrs/HampelFilter

3. https://blog.csdn.net/u010515457/article/details/105277257

4. https://ww2.mathworks.cn/help/dsp/ref/hampelfilter.html

5. https://blog.csdn.net/a_beatiful_knife/article/details/118002441![]()
![]()
本文允許重製、散布、傳輸以及修改,但不得為商業目的之使用
使用時必須註明出處自:楊明翰 , 台灣人工智慧與資料科學研究室 https://aistudio.tw